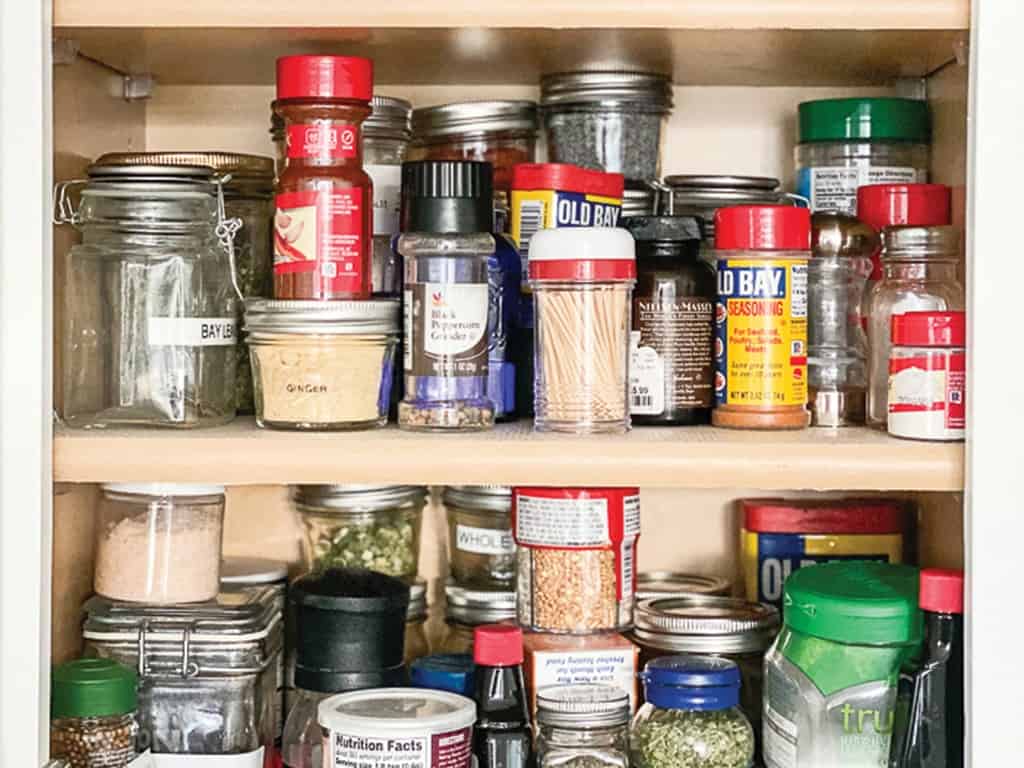
What does the inside of your spice cabinet look like? Let me take a guess—you have about three bottles of paprika (one of which dates back to the Obama administration); a few you bought for a specific recipe and only used once; and the last time you opened the cabinet to look for something, two bottles tipped over and one fell out.
Over time, the spice cabinet can become an intimidating and unruly place. Even as a professional chef, I sometimes find myself scratching my head at some of the stuff that accumulates in my kitchen. This problem is inevitable for anyone who cooks at home, but, fortunately, the solution is simple. With a bit of cleaning and some thoughtful restocking, you can bring clarity to your spice cabinet—and a whole lot of flavor to your cooking.
Do Spices Go Bad?
Sure, even 2-year-old cumin still tastes and smells like cumin, but please trust me: The flavor is not all there, and your cooking will suffer by using it. Cooking is an act of love that takes effort, and using stale spices diminishes the results of your hard work.
While there’s no hard rule for how long any given spice will last, there are a few factors of which to take note—the first being age. Toss any ground spice or dried herb that’s been open for over two years. Beyond that, trust your senses. Fresh spices still contain most of their natural aromatic compounds, and therefore have a darker-color and rich texture. Finally, the potency of a spice’s smell correlates directly to its flavor, so if it doesn’t smell like much, it won’t taste like much either.
Aroma Matters
Much like coffee beans, spices get their flavor and aroma from volatile oils. If you’ve ever ground your own coffee, you know the scent intensifies exponentially once the beans have been ground. That’s because grinding increases the surface area of the coffee bean, allowing the volatile oils to escape more quickly.
Whether they’re ground at a factory or by you in your kitchen, spices immediately start to deteriorate in quality afterward.
Obviously, the best solution is to grind your own spices, but that can be impractical for some home cooks. If you’re not quite ready to venture into the world of whole spices, I advise you buy pre-ground in small quantities. Doing so will force you to buy fresh bottles more frequently, which will go a long way in terms of flavor.
A Fresh Start
Getting started on refreshing your spice cabinet seems daunting, and trust me when I say I understand the urge to indefinitely procrastinate a cleaning task better than anyone, but it takes less time than you think—and is so worth it.
First, pull everything out of the cabinet—including the stuff you want to keep—and put it on the counter. Next, separate the spices into categories to take stock, grouping as: ground spices, dried herbs, whole spices, salt and pepper, and outliers/spice blends (like Old Bay or BBQ dry rubs).
Next, get rid of anything old—both beyond that two-year benchmark, as well as spices you haven’t touched in over a year. If you have multiples, toss the older ones. If you have multiples and they’re all old, toss them all. Remember: You’re doing yourself a favor by being ruthless here.
Keep Them in the Dark
Spices are sensitive to light, so store your spices in a cabinet, drawer or some other dark place.
4 Tips for Buying & Cooking With Spice
1. Take your time. There’s no need to immediately replace all of the spices you threw away. In many cases, you should wait until you come across a recipe that calls for a specific spice.
2. Buy quality spices. Spices off the supermarket shelf are fine—they come sealed to preserve quality right until you open them, and there’s usually good enough turnover to ensure freshness. That said, if you feel so inclined, you can do better than McCormick.
For the spices that you know you’ll use a lot, check out Savory Spice Shop in Lafayette Village, or order from Burlap & Barrel (one of my personal favorite online retailers) or Spicewalla. Spicewalla—which is based in Asheville—sells spices in small tin containers to eliminate light damage and maximize freshness.
3. Utilize premade spice blends. Spice blends like Old Bay or Cajun seasoning are great for quickly adding balanced flavor to whatever you’re whipping up. Identify some of your personal favorites and keep them around to sprinkle into eggs or popcorn, or to stir into mayo for a flavorful impromptu aioli.
4. Taste as you cook. Whenever possible, taste before and after you add spices. Training yourself to understand the flavor and function of spices will help you understand how to use them without a recipe, which is a true benchmark of being a good cook.
It’s grilling season—but, first, learn how to make a marinade for your meats using what’s already in your fridge and pantry.
If any of my talents could be considered a superpower, it would be my ability to produce a great marinade out of any ordinary group of ingredients. It comes so naturally to me that I didn’t think anything of it until I started bringing marinated meats to tailgates and cookouts. Now, friends send me pictures of the ingredients in their house and ask me to walk them through my creative-ish process.
I say “ish” because, while the process appears creative, it is—at least in my mind—very structured and logical, and, fortunately, this makes it teachable. There’s no Disney moment where I float around the kitchen allowing the perfect ingredients to present themselves to me while a symphony plays uplifting music in the background. It’s more me standing there saying things like “this needs acidity” and then finding a few bottles of vinegar and picking one. With no abracadabra required, I’m confident that you, too, can recreate the process at home.
Steps to Mastering Marinades
1. Break out your blender. Save yourself the time and cleanup of knife work by pulling out your blender. Garlic cloves, onions and herbs are in almost every marinade I make, and liquifying them in a blender is not only faster, but it extracts more flavor.
2. Summon your scraps and stragglers. If you’re like me, almost-empty sauce bottles, jam jars, onion halves and forgotten herbs plague your refrigerator. However, when I buy a bunch of meat that I intend to grill, these annoyances get purged and put to use. Pull out everything you’d love to get rid of—the thyme you bought last week, the jar with one pickle left, the fig jam you picked up for a holiday charcuterie spread, and the gaudy hot sauce bottle your co-worker curiously decided to get you for secret Santa. You don’t need to use everything, but pulling it all out will make it a lot easier for you to make decisions in the next step.
3. Pick your profile. With your driving ingredients in front of you, it’s time to decide your general direction. Great marinades require a balancing act of savory, sweet, tart, spicy and herbaceousness, but the ingredients you choose should depend on what you’re marinating. For example, the jar of strawberry jam in your fridge would bring a nice sweet complexity to a balsamic-red wine marinade for beef or lamb, but it would probably be off-putting in your lime- and beer-based taco marinade. In that case, maybe turn to your pantry for something more neutral like agave or sugar.
Start arranging ingredients on your counter by what you know you want to use, and then turn to your pantry for staples like spices, oils and vinegars to fill out the rest of your flavor profile.
4. Add and adjust. Start filling your blender, making sure to add some oil—most of the time I use something neutral like canola. Fat helps round out the flavor and texture of the final marinade, and I believe marinades with oil cook up more nicely on the grill. Eyeballing it, try to make your marinade about 20% oil.
Don’t worry about making too much marinade—it freezes indefinitely, and if you grill a lot, you’ll use it in no time.
Once you have every flavor category from the included blueprint represented in your marinade, blend it up and give it a taste. The flavor should be aggressive but agreeable, and salty but not indelibly so. Marinades don’t penetrate very far into the meat, so the flavor should be strong to compensate.
5. Pour on and pack up. When you’re happy with your marinade, put the meat (or whatever you’re marinating) in a Ziploc bag and pour the marinade over it straight from the blender. Use enough to generously coat every nook and cranny of the meat, but not so much that it’s swimming in it. Reserve extra marinade in a separate container to label and freeze.
6. Wait, cook and enjoy. With the exception of fish and tofu—which shouldn’t marinade for more than an hour or two—I prefer marinating most things from six hours to up to a couple of days. However, if you find yourself short on time, studies show that as little as 30 minutes to an hour in marinade can make a big difference.
Finally—the part where the magic happens: Be proud that you made something unique using nothing but your sense of taste and a little know-how (plus some what-to-do-with-this leftovers). And enjoy the extra space in your refrigerator—as short-lived as it may be.
Pro Tip: If you’re short on time, two-parts store-bought Italian dressing, one-part hot sauce, a squeeze of mustard and honey, and some fresh or dry herbs make a great impromptu chicken or pork marinade.
Blueprint for a Great Marinade
Savory: Soy sauce, Worcestershire, anchovy paste, miso, fish sauce, garlic, onion Sweet: Sugar, honey, agave, jam Acid: Vinegar, citrus Spice: Hot sauce (also an acid); fresh, canned, dry or powdered chile peppers; black pepper Herb: Fresh or dry herbs, pesto or chimichurri, dill pickles/pickle juice (also an acid) Fat: Sesame oil, olive oil, neutral oil (like canola) Salt: Soy sauce or kosher/sea salt Booze* (optional): Wine, beer, bourbon, tequila
*Booze doesn’t just taste good on its own, but thanks to chemistry, it enhances the existing flavors in a marinade. Many flavor compounds in food are alcohol-soluble, which means they can only be extracted by alcohol.
Fish/poultry/pork White wine/rosé • Citrus • Lighter vinegars (cider, white wine, rice) • Beer • Pickle juice
Beef/lamb Red wine • Robust vinegars (balsamic, sherry) • Worcestershire
More than any other food, the grilled cheese sandwich triggers nostalgia in seemingly everyone. In its simplest form, it’s made by buttering whatever sandwich bread you keep in the house, unwrapping a never-expiring slice or two of American cheese, and flipping it in your favorite skillet until the outside is golden-brown and the cheese is molten. It’s universal; it’s iconic; and when you need a dose of comfort, it’s irreplaceable.
There may be times, however, when you want to bring other cheeses and ingredients into the mix. If that’s the case, there’s a handful of tools and tricks to help you go from having a grilled cheese on your mind to one on your plate with as little fuss as possible.
The “Grilled Cheese” vs. “Melt” Debate Some people who like rules more than having a good time insist that if you add anything other than cheese to a grilled cheese, it becomes a melt. I’d argue that if the cheese is the star of the sandwich, it’s a grilled cheese—no matter what else is in it.
Bread and Spread It’s hard to beat sourdough for grilled cheese. Sourdough’s slight tang contrasts cheese’s richness, and its naturally higher moisture content allows the bread to remain chewy once the outside has been toasted. That being said, a grilled cheese on multigrain or whatever you have lying around beats going to the store when you’re already in the mood, so use what you have.
To complement the bread, spreading softened butter liberally edge-to-edge over the outside of the bread before cooking is commonplace. But butter can take an hour or so to soften enough to spread, and sometimes the desire for grilled cheese can strike swiftly and unpredictably. So, in lieu of softened butter, I often reach for mayo because it’s spreadable right out of the fridge.
Mayonnaise, like butter, is mostly fat, so it functions similarly. While I slightly prefer the flavor of butter, mayo has the advantages of containing a little bit of egg and vinegar or lemon juice. The egg crisps up to aid in the toasting of the bread, and the vinegar—much like sourdough—provides a slight, balancing tartness.
Get Cultured Cultured butter is made by churning fermented cream instead of fresh, resulting in a tangier, more complex flavor. It’s more expensive, but it’s great on a grilled cheese, or simply served with bread at the dinner table.
Choosing Cheese Most cheeses contain the same handful of ingredients, but their flavors, textures and chemical composition vary wildly. Let that sink in—brie, Parmesan, cheddar and countless other cheeses start with almost the exact same ingredients, but different bacteria, enzymes and processes transform them into almost incomparable products. Given how complex the world of cheese is, you should select your grilled cheese fodder carefully and deliberately.
Because of the way it’s processed (and what it’s processed with), our grilled cheese gold standard—American cheese—melts extremely well. But more natural options exist—just look for something relatively young and high in moisture. Most sliced sandwich cheeses like mild cheddar, Monterey Jack, havarti, Muenster, provolone and Swiss work great. If you’re going for something a bit more gourmet, go to a high-quality grocer like Wegmans or Weaver Street Market, and ask someone behind the cheese counter.
Don’t Skimp This isn’t a diet food, so load up on the cheese. Use at least 3 oz.—that’s about four standard grocery store slices—to really put the cheese front and center.
A Personal Touch Once you’ve picked your bread and your cheese, take a look in your fridge and pantry. A lot of things go well with cheese (think of the endless combos on charcuterie boards), so use your imagination. Whatever you choose, make sure it can be spread lightly, sliced thinly, or chopped and distributed modestly to ensure it complements the cheese rather than dominating it. Add-ins can be as simple as a cheddar grilled cheese with chopped bacon or as nuanced as Gruyere with blackberry preserves and tarragon. Use what you have in the fridge or the garden, and have fun with it.
Make Sure It Melts We’ve all been there… pulling a perfectly golden-brown sandwich out of the skillet and cutting into it only to find a lukewarm center in which the slices of cheese are so not-melted that you can still count them.
While grilled cheese is a relatively quick meal, its cooking cannot be rushed. Start the sandwich in a cold nonstick, carbon steel or cast-iron skillet (or griddle, if you have one), and bring it up over medium-low to medium heat—depending on the power of your range. By the time the bottom of the sandwich has seared, the middle will have gradually heated to the point that it’s almost melted.
Then flip it to finish for color on the other side. Depending on how much cheese you’ve packed into your sandwich, you may want to drop the heat a little after you flip the sandwich just to ensure it melts.
The Grilled NC Whether you have out-of-state guests or just want to support local (and you should!), you can can pick up all NC-sourced ingredients that you need for a groumet grilled cheese at these two local stores: Union Special Bread (for the bread, of course) and Weaver Street Market (for the rest). Bread: Union Special sourdough | Spread: Maple View Farms butter, softened to room temp | Cheeses: Chapel Hill Creamery’s Hickory Grove; English Farmstead Cheese’s Ashford cheddar | Add-ins: Lady Edison country ham; L&B Apiaries Spring Bouquet honey
The very best cooks, home and restaurant alike, share a singular trait: curiosity. They try new things… not just new recipes from familiar cookbooks, publications or Pinterest, but entirely new processes—from baking bread from scratch to taking the plunge into deep-frying at home to searing off and then braising their first short rib.
What makes a great cook is not success rate, but a willingness to attempt, absorb, adjust and add to their repertoire.
So, whether you’re an ambitious cook looking for your next endeavor or an average cook looking for an easy win on unfamiliar culinary turf, I implore you to try one of my absolute favorite techniques: confit.
Like many favorite meats (think bacon, prosciutto, jerky), confit—which, besides the verb to describe the technique, is also a noun to describe the end product—was born years ago out of necessity to preserve food in the pre-refrigeration era. And, like those other popular preserved meats, we still make confit today—because it tastes great.
Traditional Duck Confit
Originally, confit was made on Gascon duck farms in autumn when fattened ducks were harvested for their livers to make foie gras. The process yielded a lot of meat as a byproduct that needed to be preserved and eaten throughout the winter.
The process is simple: Cure the duck legs in salt and spices; submerge them in duck fat; and cook them in a very low-temp oven until extremely tender. The legs are then stored in the duck fat, often in the same pot in which they were cooked.
The fat not only keeps the meat extremely juicy during the cooking process, but also keeps oxygen from coming in contact with the meat as it ages in storage, preserving it almost indefinitely. Most gourmets argue that the quality of the confit improves when it is allowed to age—or ripen—for a few weeks to a few months. However, if you’re like me, and you lack the patience and fridge/cellar space to store your confit for extended periods of time, confit is plenty delicious the day you make it.
What Else Can I Confit?
While duck is not as readily available here as it is in the south of France—and where on offer, it’s expensive—fortunately, we can apply the principles of duck confit to more accessible and affordable meats to yield some luxurious cuisine on a Lilliputian budget.
Chef’s Tip At the Raleigh Wegmans, fresh duck legs sell for $11.49/lb., while confit duck legs go for $33.60/lb
If you’re familiar with this column, you might know a bit about collagen—the rigid muscle fiber developed in the hardest-working parts of animals (think legs, shoulders, wings, etc.). Since collagen makes these cuts of meat tougher than filet mignon or chicken breast, they’re often less expensive. However, this tough tissue has a key benefit: It melts decadently and transforms into gelatin. You can see this alchemy in action at any barbecue joint, where tough cuts of meat are smoked slowly over smoldering hardwood until you can cut into them with a spoon.
Confit works similarly to barbecue in that the crux of its success relies on gently converting collagen into gelatin, but since confit utilizes fat as its cooking medium instead of air or smoke, it does a far superior job of trapping in moisture. By following the simple processes shared by all confit recipes, I have transformed tough—and cheap—cuts of beef, pork, lamb and chicken legs into culinary gold. It truly is so simple—and so incredibly good. I urge you to try my recipe below, and then branch out into the myriad of resources online and in cookbooks.
If you’re familiar with this column, you might know a bit about collagen—the rigid muscle fiber developed in the hardest-working parts of animals (think legs, shoulders, wings, etc.). Since collagen makes these cuts of meat tougher than filet mignon or chicken breast, they’re often less expensive. However, this tough tissue has a key benefit: It melts decadently and transforms into gelatin. You can see this alchemy in action at any barbecue joint, where tough cuts of meat are smoked slowly over smoldering hardwood until you can cut into them with a spoon.
Confit works similarly to barbecue in that the crux of its success relies on gently converting collagen into gelatin, but since confit utilizes fat as its cooking medium instead of air or smoke, it does a far superior job of trapping in moisture. By following the simple processes shared by all confit recipes, I have transformed tough—and cheap—cuts of beef, pork, lamb and chicken legs into culinary gold. It truly is so simple—and so incredibly good. I urge you to try my recipe below, and then branch out into the myriad of resources online and in cookbooks.
Read This Online: J. Kenji López Alt’s column, The Food Lab Print: Charcuterie and Pâté, Confit, Rillette by Michael Ruhlman
RECIPE
Garlic-Rosemary Chicken Confit
Ingredients:
1 pack each bone-in, skin-on chicken thighs and drums (about 3-4 lbs. total)
2–3 Tbsp. kosher salt (Diamond Crystal preferred)
5 cloves garlic, chopped
3 sprigs rosemary, chopped
1 lemon zest
Freshly ground black pepper
1–1 1/2 quarts lard, duck fat, extra-virgin olive oil or neutral oil (I almost always use lard because it is the closest and most affordable alternative to duck fat.)
Process:
Using about 3/4 tsp of salt per thigh or drumstick, individually salt the chicken on all sides and place on a big platter or sheet tray.
Grind pepper and sprinkle garlic, rosemary and lemon zest onto both sides of the chicken thighs and on all sides of the drums, pressing to adhere.
Transfer into a large Ziploc bag and squeeze as much air out as possible. Allow to cure overnight, or up to 2 days. If you’re doing a longer cure, flip and massage the bag every 8–12 hours.
Preheat the oven to 200°F and snugly lay the meat in an
oven-safe pot in 1–2 layers. If using lard or duck fat, melt it in a separate pot on the stove. Pour enough fat or oil over the meat to cover.
Cook uncovered for 4–6 hours or until very tender. The meat should cling slightly but flake easily from the bone.
Chef’s Tip Don’t be alarmed by how much fat you’re dumping into the pot—it won’t be absorbed by the meat.
If you ask me what my favorite thing to cook is, you’ll launch me on a two-minute diatribe that boils down to “I don’t know” and “it depends.” If you ask my girlfriend, she’ll say—without flinching—scrambled eggs. I have to say, it hurts my feelings a little bit. I’ve spent days prepping a single meal—rolling stocks, fermenting doughs, curing meats—but with Lizzo-like confidence, she always says “scrambled eggs.”
Don’t get me wrong: I love making scrambled eggs. And while no two batches ever come out the same, I always follow the same creative process when I make them. The result looks more like a colorful stir-fry with greens, leftovers and veggies. Scrambled eggs, done this way, are an excellent way to clear out your fridge, reduce food waste and consume a healthy serving of veggies to start your day off with a win.
Choose Direction and Gather Ingredients
Before you can start cooking, you need to look in the fridge; assess your ingredients; and pull everything you want to use onto the counter. Since there’s a lot of simultaneous cooking and cutting about to happen, I line everything up behind my cutting board so I don’t forget about anything. For my scrambled egg process, ingredients fall into five categories: eggs, dairy tenderizers, seasonings, chopped mix-ins (chunkies) and, of course, cheese.
Eggs Two or three eggs per person recommended.
Dairy Tenderizers There’s a lot of debate online about whether to add milk, half-and-half, heavy cream, sour cream or cream cheese to scrambled eggs. Since all of these options work to the same effect, I say use whatever you have—life’s too short to be a zealot.
Seasonings Seasonings are mixed directly into the eggs. The seasonings you choose largely dictate the overall flavor profile of your final dish, so be creative and choose wisely. For example, if I found two slices of prosciutto and a half-finished jar of artichokes, I might reach for pesto. If I’m working with leftover taco meat, peppers and onions, I might reach for hot sauce and chopped scallions and/or cilantro.
Chunkies In my opinion, the chunkies turn normal scrambled eggs—which I consider a side dish—into a full nutritious meal. Look for leftover roasted veggies, the pack of deli meat that isn’t quite enough to make a sandwich or the three baby carrots in the bag that somehow made it to the bottom of the drawer.
Cheese Use what you like, and your eggs will taste better.
Bringing It Together
Treat your eggs. Conventional culinary wisdom says salting eggs before cooking them makes them watery, but food writer and personal hero of mine J. Kenji López-Alt proved the opposite in a series of side-by-side tests. If you have time to mix your eggs with salt and your selected dairy and seasonings 30 minutes before cooking them, your final dish will benefit. That said, any amount of time will help their overall texture, so before you do anything, mix up and flavor your eggs.
I check the eggs seasoning by tasting a tiny bit raw on the back of a fork or spoon. Since I’m comfortable eating raw eggs (as they exist in mayonnaise), I’m OK with tasting my eggs raw. If that grosses you out, use about 1/4 teaspoon of salt per egg, depending on how much salt is in your other add-ins.
Cut and saute chunkies. If you’re cooking for one or two people, heat a 10-inch nonstick saute pan or well-seasoned cast-iron or carbon steel pan and add butter or oil (unless you’re using bacon, which will produce plenty of fat on its own). Starting with what needs to cook the longest or what you want to brown the most, cut ingredients into bite-size pieces and add them directly to the pan, sauteing over medium-high heat.
Cook in eggs and plate. Choose your serving plates or bowls, and line them up for easy plating when the time comes.
Add eggs to the hot pan and stir slowly for about 30 seconds until a spatula dragged across the bottom leaves a line across the pan. Then add the cheese and stir until the eggs are almost cooked through (but still a little runny) and plate. The eggs will continue to cook for a short amount of time once they’re out of the pan.
In this series, local chef Bobby McFarland offers tips on how to cook like the pros. Currently the lead culinary consultant at The Kitchen Raleigh, McFarland loves eating pomegranate, cheese and all things pork.